
Introduction
The LM-Light Standard
- Course Structure
- LM-Light Tags
- Starting a Course
- On Each Page
- Exiting a Course
- Starting a Test
- Saving a Test Score
- Course Completion
- Configuration File
Course Development
- Development Environment
- Using a Text Editor
- Including Tests
- Using PowerPoint
- Option 1 - PDF
- Option 2 - GIF/JPG
- Option 3 - HTML
- Using Lectora
- Download Tools
- Diagnosing Problems
Home Page
|
Course Development : Using a Text Editor
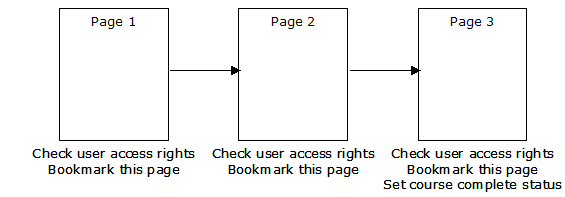
In order to show you just how easy developing LM-Light compatible courses can be, here's how to use a text editor such as Wordpad or Notepad to create a 3 page course that bookmarks each page, and that flags course completion to the LMS when the student views the third page.
- Start by creating a folder/directory on your local PC.
- Within the folder, create a document called index.html. Type in the following content:
<?php require "LM-Light.php"; ?>
<?php LMsetBookmark(); ?>
<html>
<head>
  <title>Page 1</title>
</head>
<body bgcolor="#ffffff">

<p><a href="2.html">Go to Page 2</a>

<p>This is Page 1

</body>
</html>
This is the first page. Note that we've highlighted the code that's specific to LM-Light. You can find an explanation of what each of the tags means on [this page].
- Within the folder, create a document called 2.html. Type in the following content:
<?php require "LM-Light.php"; ?>
<?php LMsetBookmark(); ?>
<html>
<head>
  <title>Page 2</title>
</head>
<body bgcolor="#ffffff">

<p>
  <a href="index.html">Go Back to Page 1</a> |
  <a href="3.html">Go to Page 3</a>

<p>This is Page 2

</body>
</html>
- Within the folder, create a document called 3.html. Type in the following content:
<?php require "LM-Light.php"; ?>
<?php LMsetBookmark(); ?>
<?php LMsetCourseComplete(); ?>
<html>
<head>
  <title>Page 3</title>
</head>
<body bgcolor="#ffffff">

<p><a href="2.html">Go Back to Page 2</a>

<p>This is Page 3 ... Course Completed

</body>
</html>
- Finally, create a document called config.txt. This contains descriptive information that you want to pass on to the LMS administrator. Type in the following content:
title: This is the Course Title
author: My Name
version: 1.0 - June 13, 2026
width: 800
height: 600
description: This is My First Course!
You can find out more about the content of the configuration file on [this page].
The course structure should look like this:
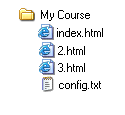
The complete folder can be sent to the administrator of a Learning Managment System to be installed for students to access.
|
