Course Development : Using PowerPoint : Option 3 - HTML Page
Note: If you'd like to look at the files as you follow through this technical note, you can download them all as a 0.5MB zip file from [this link].
Microsoft PowerPoint can be used to create simple LM-Light compatible courses using the 'Save as Web Page' feature. You should note that PowerPoint is only a partial solution to creating web-based training since you can't use it to develop a mastery test for your course. However, recognizing just how widely PowerPoint is used in business and education, it's still a tremendous way to create many forms of educational content. The following example uses Microsoft Office 2000, so the instructions might not exactly match the version that you have. But the principle is the same for all versions that support the 'Save as Web Page' option. We're going to take an existing presentation - in this case, a short extract from a training class developed by Cosaint Inc. - and convert it to an LM-Light compatible web-based training module. We're going to take advantage of the LM-Light tags so that all of the slides are bookmarked, and flag the course as complete when the final slide has been viewed. Back to Top
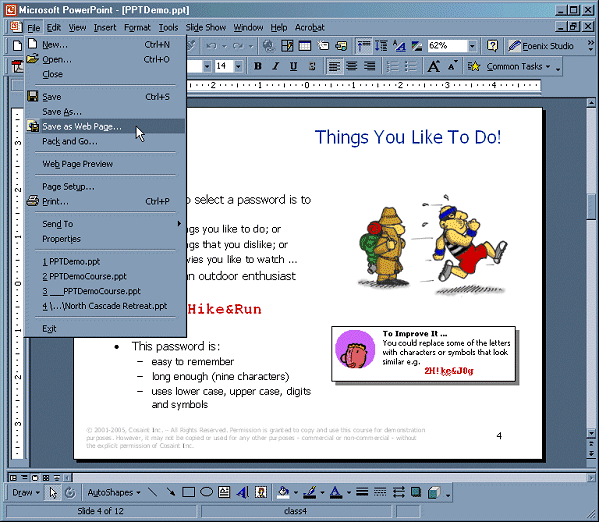
We start by opening the existing presentation in PowerPoint. Then, from the 'File' menu, we select 'Save as Web Page'.
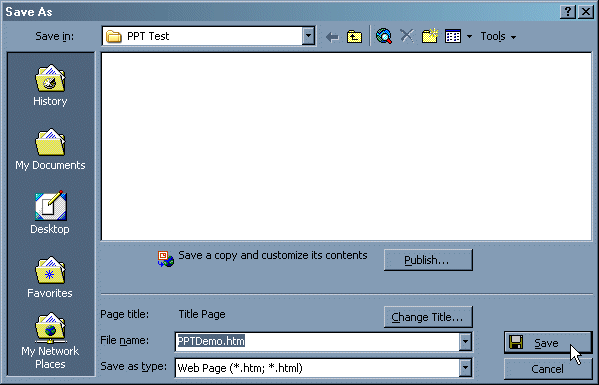
When the 'Save As' window opens up, you can either click on 'Save' or enter the 'Publish ...' menu and play around with some of the options. These options may be important if you have to support older browsers. We won't go into these in detail since they're outside the scope of this note. But you should note that 'Save As' may require you to rename the file that you're saving to comply with the 8+3 Microsoft convention.
Once the file has been saved, you'll find that you have a .htm file and a folder with the name of the presentation - in this case PPTDemo. We'll refer to the .htm file (PPTDemo.htm in our example) as the 'default start page' - you'll need to know this filename for the next stage. Back to Top
You'll find that PowerPoint doesn't create an index.htm file. So you'll need to add one in order to comply with the LM-Light standard. Open your favorite text editor (e.g. WordPad) and enter the following: The key here is the 4th line which starts <meta http-equiv= ... When this index.html file is read by the student's browser, this line instruct the browser to redirect itself immediately to the file that you specify - in our case, the start page for the course. Here's how it would look for our example course: Save this file into the same folder as your default start page. Back to Top
Note: This step is optional.
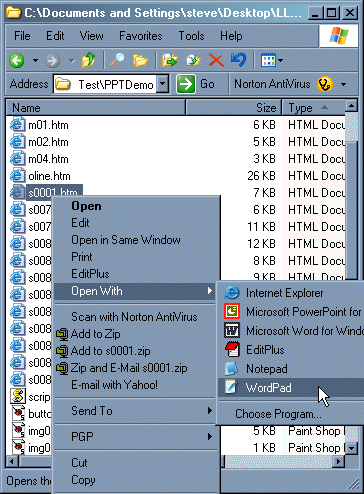
Now take a look inside the folder that PowerPoint created. You'll find that PowerPoint creates a series of files called s0001.htm, s0002.htm, s0003.htm ... (although there may be gaps in the numbering sequence). These are the slides. Generally - but not always - the lowest number is the first slide, and the highest number is the last slide. We're now going to edit the slides so that they include the necessary LM-Light tags. For each slide .htm file, right click on the file, click 'Open With' and choose your favorite text editor (e.g. WordPad).
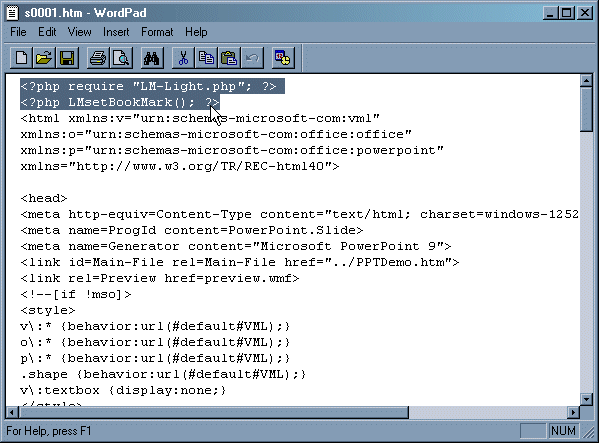
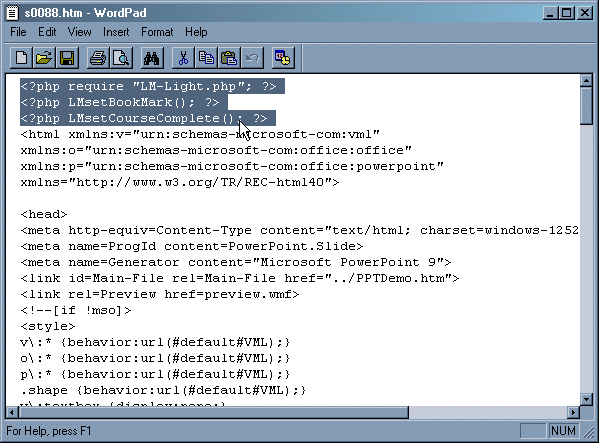
When it opens up, add the following to the top of the file before any Microsoft-generated content: These tags authenticate the user to make sure that he/she has the right to view the course, and then bookmarks the page. Do this for all of the slides. Back to Top
Note: This step is optional.
When you edit the final slide, you're going to insert an additional LM-Light tag that will tell the LMS that the course is complete. So, start by locating the final slide. This is usually - but not always - the slide with the highest numerical value (see above). Edit the file and add the LMsetCourseComplete() tag so that it looks like this: Back to Top
Note: This step is optional. Finally, open up your text editor and create a course configuration file like this: Save this in the same place as you saved the 'index.htm' file in Step 2 (see above). Back to Top
Congratulations, you've created an LM-Light compatible course from a PowerPoint presentation. All that's left is to transfer the course to the LMS adminstrator. You do this by sending the folder containing the slides, images, configuration file and start page (index.htm) - typically as a zip file. Back to Top
Use this checklist as you convert a PowerPoint presentation to LM-Light format:
Note that only steps 1, 2 and 6 are required. Steps 3, 4 and 5 are optional.
|
|
|||