Course Development : Using PowerPoint : Option 2 - GIF/JPG Images
If you have an earlier version of PowerPoint and you don't have a third party tool to create PDF files, you can also create courses by exporting slides as individual GIF or JPG images. You can then "wrap" the slides in HTML files which provide the on-screen navigation controls for your course as well as the interactions with the LMS (bookmarking, setting course complete).
This is essentially a 4-step process:
- Create the image files.
- Create the HTML 'wrappers'.
- Add an 'index.html' file.
- Package things up.
In order to view courses developed in this way, students need nothing other than a standard web browser.
Step 1 - Create the Image Files
Follow these steps:
- Open your presentation within PowerPoint.
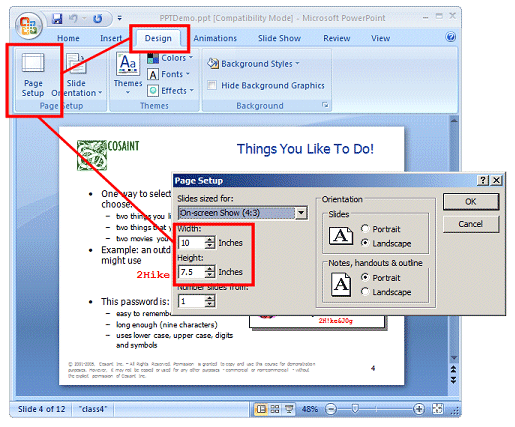
- If necessary, start by resizing the slides to an appropriate size. You may need to do a little experimentation to get this right. Alternatively, you can use a graphics program to resize the images one-by-one after you have created them.
- Go to [File/Save As/Other Formats].
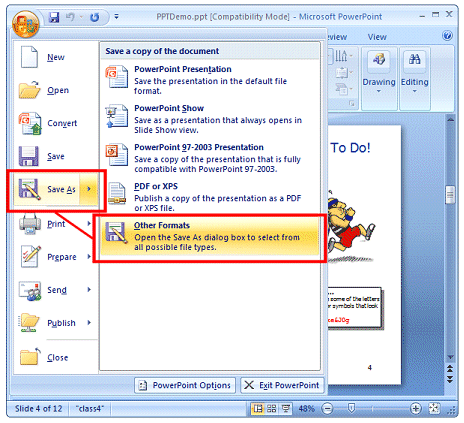
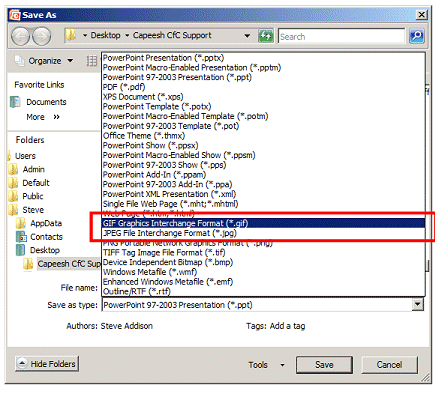
- Choose either GIF or JPG Images.
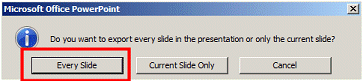
- When prompted, select "Every Slide" and save the presentation to a folder on your local computer.
Step 2 - Create the HTML 'Wrappers'
Each slide image file now needs to be 'wrapped' in an HTML file. The HTML file can take any one of a number of formats - here's a simple way to do things:
<?php require "LM-Light.php"; ?>
<?php LMsetBookmark(); ?>
<html>
<head>
<title>[the title of your course]</title>
</head>
<body>
<p>
      <a href="index.html">Home</a> |
      <a href="[name of the HTML file for the previous slide]">Back</a> |
      <a href="[name of the HTML file for the next slide]">Next</a>
<p align="center">
      <img
          src="[name of the slide image file]"
          height="[height of the image in pixels]"
          width="[width of the image in pixels]"
      >
</body>
</html>
The 'wrapper' for the last slide is slightly different since it includes the setCourseComplete tag, and doesn't have a link to the next slide:
<?php require "LM-Light.php"; ?>
<?php LMsetBookmark(); ?>
<?php LMsetCourseComplete(); ?>
<html>
<head>
<title>[the title of your course]</title>
</head>
<body>
<p>
      <a href="index.html">Home</a> |
      <a href="[name of the HTML file for the previous slide]">Back</a> |
<p align="center">
      <img
          src="[name of the slide image file]"
          height="[height of the image in pixels]"
          width="[width of the image in pixels]"
      >
</body>
</html>
To make this a little easier for you, we've created a macro that will generate a set of 'wrapper' files that you can use. You can find the macro at the bottom of this page.
Step 3 - Add an 'index.html' File
An LM-Light compatible LMS needs to know where to look for the first slide, and it will start by looking for an 'index.html' or 'index.htm' file. So, in the same directory/folder as your slides, create a file called 'index.html' with the following content:
<?php require "LM-Light.php"; ?>
<html>
<head>
<title></title>
<meta http-equiv="refresh" content="0; URL=[name of the first slide file e.g. slide01.html]">
</head>
<body>
</body>
</html>
Note that the 5th line (highlighted in blue above) needs to include the name of the first slide in your presentation. When the student's browser reads the 'index.html' file, it will immediately redirect and display the slide.
Step 4 - Package Things Up
Finally, add a 'config.txt' file to the folder (this is optional), and zip it all together. This zip archive can now be sent to the LMS administrator for loading into the LMS.
Pros and Cons of This Approach
- Pro - This approach allows you to record the course start, bookmark the most recently viewed page, and record when the final slide has been viewed.
- Pro - It's independent of any third-party plug-ins - both on the authoring and student sides. This can be a great advantage if your IT system doesn't support them.
- Pro - The course will start displaying as soon as the first slide is downloaded which is helpful when the course is very long.
- Con - It has the disadvantage that you may need to set the image size within PowerPoint before exporting the slides, and this can take a little time to set up.
- Con - You'll also need to be able to create the 'wrapper' files for the slides which requires some (very basic) HTML knowledge.
- Con - You'll also lose slide transitions and effects since the image files will simply render the slides as static pages.
You can use this macro to create 'wrapper' files for images that you've produced using PowerPoint. Note that you may still have some editing to do to make sure that all of the file names are accurate.
|
